.png)
A Requisition is a free form purchase order tool that requires all information to be manually entered. This is a blank purchase order template used to submit an order to a Supplier or to record a transaction in the system. To place an order through the Requisition Form, follow the steps listed below.
Place an Order through a Requisition Form
-
Go to View > Purchasing > Requisition Form.
-
If you have access to more than one location, select the location you are placing an order for from the Ship To drop down list.
-
Select a Supplier from the Supplier Selector window.
-
By default, the Supplier Selector window only shows suppliers for which you have purchase history.
-
Search the list by typing in the Supplier Name column. If no results are found, the Supplier Selector window automatically expands results to include all suppliers used by your organization.
-
-
The Item Entry window will pop up. Use Item Lookup to attempt to find an item that already exists in the system otherwise enter:
-
Item Number
-
Item Description
-
Unit of Measure
-
Pack Size
-
Quantity
-
Price
-
General Ledger Coding
-
-
Click Save & New to enter more items or Save & Close to move forward with your order.
-
When you are finished entering items and have selected Save & Close, you will be brought back to the Requisition screen.
-
Click Edit next to Notifications.
-
Select Transmit under Supplier Notification Settings.
-
Choose Fax or Email from the User Specified drop down list.
-
Enter the corresponding information in the blank provided.
-
Click Save.
-
Review this screen to ensure all information is correct then click Review.
-
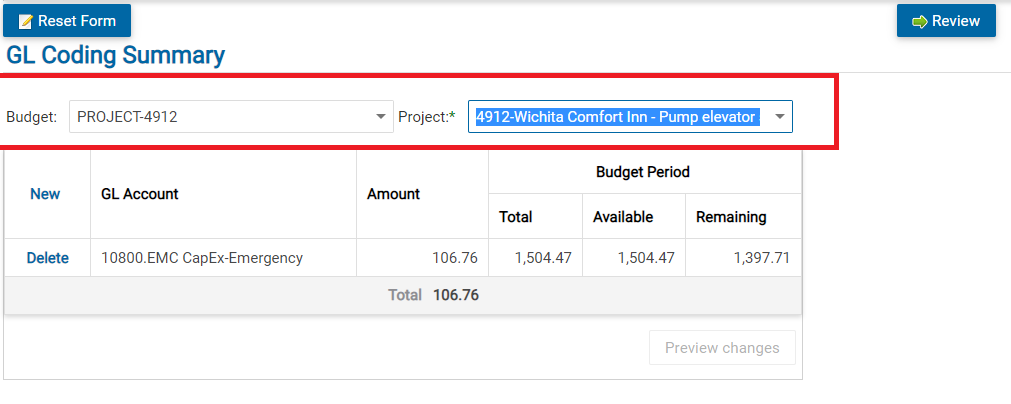
Note: For CapEx orders, when placing an order through a requisition form you will need to select a Budget and Projectin order to advance to the review screen.
-
-
The Review screen allows you to make a final check of your order then select Save to Cart, Cancel, or Submit.
-
If you want to proceed with this order click Submit.
-
Wait for the Order Confirmation screen which ensures your order has been captured and is processing.
Requisition Items
-
Item Lookup - To search by item name or number, click the ‘…’ ellipsis. You can search for a specific item name or number using the column filters, or you can go down the list and check the boxes next to the items needed, then select Save. All selected items will be added to your order.
-
Note: You can also filter down the results by using the drop down filter on the bottom left corner of the window; you can view All, Selected, or Unselected items.
-
-
Item Number - As you begin typing in the Item number, the list of items will populate. If you don’t know the item number, select N/A checkbox and the system will generate a temporary item number
-
Note: When typing in an item number, list will populate all items that begin with that number. Ex: Enter ‘2’, list will populate 2000, 2323 etc.
-
-
Item Description - Input the item description/name. Note: In this section, when you enter a word, the list will populate all items containing that word anywhere in the description.
-
Unit Of Measure - As you begin typing the Unit of Measure for the item, the list of options will populate.
-
Pack Size - Enter the Quantity per Unit for an item. Ex. If U/M is Case Enter 24, 12, etc…
-
Quantity - Enter the quantity for each item selected.
-
Price - Price of the item.
-
Tax - Check the box if this item subject to tax.
-
GL Account - Input assigned GL account number.
-
Total (Pre-Tax) - Displays the extended price for each number of items ordered.
Notifications
When placing an order through the Requisition form, you will need to select a form of Transmit Method. Once you have made your selection, click Save.
-
Don't Transmit - The order will not be transmitted to the Supplier.
-
Transmit - When selecting ‘Transmit’ you will need to select either System Specified (if available), which will transmit the order by defaulting to the transmit method setup on the system; or if user Specified is selected, you will need to select Fax and/or Email and enter the appropriate information.
-
Personal Notification Settings - You also have the option of printing and/or sending a copy of the Order to yourself.
View or Edit a Requisition
-
Go to View > Workflow Queue.
-
Search for Requisition by Confirmation #, Approver List, Order Date, Ordered By, Location, Supplier, or Order $.
-
Click the check box next to the Requisitions you wish to manage.
-
You can view or alter the order by clicking the Confirmation #.
-
Change or edit the quantities, if necessary.
-
Click Review at the bottom of the page.
-
Verify the order is correct by clicking the check box.
-
Click Submit.