.png)
Create an Inventory Period
On this screen you are able to create an Inventory Period for any specific range of dates, depending on the start and end.
Inventory periods can be setup in daily, weekly, or monthly intervals.
-
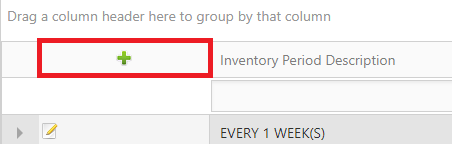
View > Inventory > Period Setup.
-
To create an Inventory Period, click the green plus sign.
-
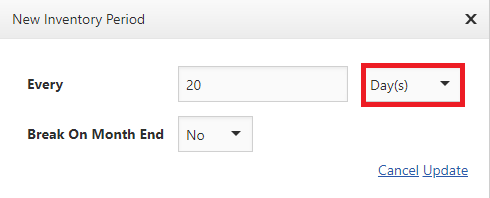
Select whether this period will cycle in a Day, Week, or Month long period.
-
Fill in the number of days, weeks, or months this period cycle will regenerate.
-
Select Update, the period will be created and displayed on your list.
Note
To edit an Inventory Period go to View > Inventory > Period Setup > locate the Inventory Period > click the ‘Edit’ button > edit information > Update.
Adding a Location to an Inventory Period
If details of a particular inventory period need to be altered follow the steps below.
-
To add a Location to the Period > click the expand button.
-
Click the green plus sign > search for a location to add > check the box on the left > select the Basis Date from the drop down list.
-
Click the Add Selected Locations button at the bottom to add the specific locations.
-
To add all locations click on Add All Locations. This will add all locations that are not assigned to an inventory period to this period.
-
You will be prompted back to the Location list screen. Once you are finished adding locations, Save. To edit a location > check the box next to the location > click Edit Selected > edit date > Save.
Note: To delete a location, click the red X to the left of that location > Confirm Delete > OK.
Opening/Closing an Inventory Period
The action of closing the previous period is what creates and opens the next period.
To close a period:
-
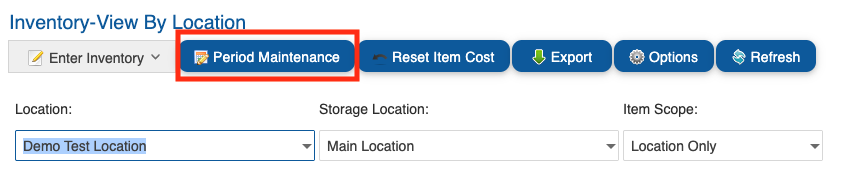
View > Inventory > By Location.
-
Select a location from the drop down list.
-
Click on Period Maintenance button
-
Navigate to a period row from the Inventory Period list > click on the Closed Lock icon

to close Period > click OK to confirm closing the period > Once success message appears click Close.
If a period needs to stay open and the next period needs to open, users will need to:
-
Close the period trigger the opening of the next period by following the steps above.
-
Then re-open that first period by clicking on the Unlocked icon.

This will keep both the past and the new period open.
Note
-
Require Count to Close Inventory - If the setting Require Count to Close Inventory is set to ‘Yes’, you will have to set the transaction type to ‘Count’ and enter the quantity before you can close the Inventory Period.