.png)
The QR Inventory function in the EPRO mobile app allows users to create QR codes for their items. Anyone with the mobile app and access to the Inventory module can scan the QR codes using their mobile device's camera and enter inventory counts.
More information on Inventory can be found here: https://help.cinemasolutions.com/docs/Working-version/inventory
More information on the mobile app can be found here: https://help.cinemasolutions.com/docs/Working-version/epro-mobile
Navigate the QR Inventory module
-
To access the QR Inventory module, tap on the hamburger menu and select QR Inventory. If you do not have access to the inventory module, this option will not be available.
-
Upon accessing the module, you'll be taken to the Enter QR Inventory page. If you still need to create QR codes for your items, you can click on the Create QR Codes option at the bottom of the screen. More information about these pages can be found below.
Create QR Codes
First, we will need to choose what items to create QR codes for.
-
To create QR codes, go to the Create QR Codes page.
-
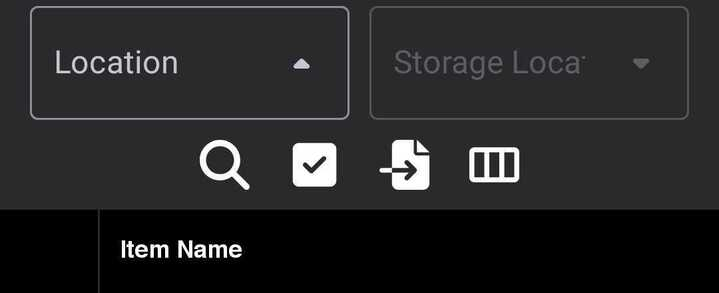
Here, you need to choose the location you want to create QR codes in the Location drop-down. . For some locations, can pick a Storage Location.
-
Once you've selected a location, you can choose multiple items to create QR codes for.
-
Use the tools on the top control bar to search for items, select all items for a location, import an existing QR sheet, or show all columns of additional data for the items.
In order, they do the following:
-
Tap the Magnifying Glass to search for items by their name
-
Tap the Checkbox to select all items, or after you search for something with the magnifying glass this will select all items from that search.
-
Tap the Import button to import an existing QR sheet. On every previously created QR sheet, there is a Reference ID. After tapping the Import button, you will be able to enter that Reference ID to load the items on the QR sheet.
-
Tap the Columns icon to show all columns of additional data for the items. Initially, the page only loads the Item Names.
-
Tap on the needed items to check them. After selecting the necessary items, click Next.
You'll be directed to the Arrange Items screen, where you can verify and manipulate the items to be included in your QR sheet while also being able to make modifications to the layout of the sheet.
-
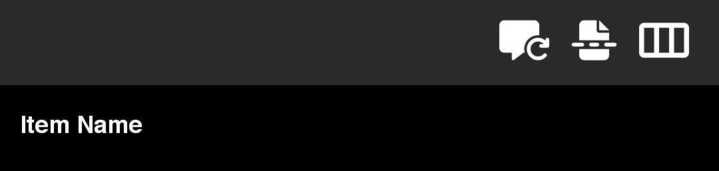
Utilize the tools to add a custom label, add page breaks, show additional data columns, remove items/page breaks.
-
Tap the Page Label icon to add a custom label to the QR Sheet on every page.
-
Tap the Page Break icon to add a page break to your item list. Wherever the Page Break is added, a new page will start.
-
Tap the Columns icon to show all columns of additional data for the items. Initially, the page only loads the Item Names.
-
To remove an item, swipe to the left and click the red X icon.
-
To re-arrange the order of the items and Page Breaks, press and hold on the row that needs to be moved. Then, drag and drop to the desired location in the page order.
2. Once you've arranged the items and page breaks, tap Generate QR Codes.
-
After pressing Generate QR Codes, a custom QR sheet will be created, which you can view using a PDF viewer like Adobe Acrobat. You can then print or email the PDF.
-
This file can be viewed again under today’s date in the EPRO Files module.
QR Codes Sheet
-
The QR Codes Sheet will contain a custom header at the top of every page including:
-
Custom Page Label (if added)
-
Reference ID of the created QR Code list, this can be used in the future to import an existing QR sheet item list.
-
Created By line that lists the user who created the list, the date and time it was created
-
-
On the first page, there is:
-
An Instructions section provides a quick reference to entering Inventory with the QR Inventory function on the mobile app.
-
The link to the Help Site
-
Instructions on how to Modify this list
-
-
The following pages will list the Item Names on the same line as the QR Code for each item.
Enter Inventory with QR Codes
-
To enter inventory using QR codes, go to the Enter QR Inventory page.
-
Choose the Location and Storage Location (if applicable) from the drop-down menus
-
Select the Transaction Type (e.g., count, comp, damage, return, sales, spoilage, waste). Only one Transaction Type can be selected during an Inventory submission session.
-
If there are multiple Inventory Periods open, choose the desired period from the drop-down menu.
Once you've filled out the necessary filters, you can start scanning items. The # item(s) scanned line will keep track of how many items have been scanned.
-
Aim your device's back camera at the QR code of the first item.
-
When an item is scanned in, a pop-up will appear with the item's name. The Count pop-up defaults to enter the Outer Count and if applicable to that item the Loose Count. After a count has been entered, click Save. You will see the # item(s) scanned line jump up by 1.
-
You can only scan an item once. If you try to rescan the same item, you'll receive an 'Item Already Scanned' pop-up.
-
Continue scanning until all needed items have been scanned, then tap Review & Submit.
Review and edit the item count if needed before completing your Inventory submission.
-
Tap the count number under the Outer Count or Loose Count column to edit.
-
To remove an item, swipe to the left and click the red X icon.
-
Tap the back arrow at the top left to scan more items or edit the top 4 filters.
-
After reviewing, if you're satisfied with your inventory count, tap Submit Inventory.
Inventory Submission Receipt
-
After submitting, you will receive an Inventory Submitted pop-up. This pop-up advises there is a receipt of Inventory count that can be viewed under the EPRO Files module.
-
Tap on the hamburger menu, then select EPRO Files to access. Find the Inventory Receipt under today’s date.
-
The Inventory Receipt page provides the Location, type of inventory transaction, period, date and time submitted, number of items submitted, then a list of the items and the counts.
-
You must use a PDF viewer such as Adobe Acrobat to view this sheet. If desired, you can print or email the PDF of your inventory receipt.